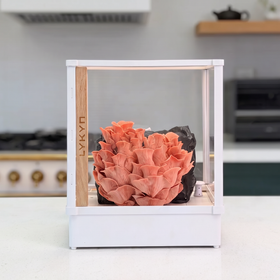

How to Set Up Your Lykyn Chamber

Getting started

How to Set Up Your Lykyn Chamber

From box to first grow in about four minutes. Pick your chamber below and follow the video.

Single Layer, Bone White

Assemble Your Single Layer Chamber

The new Single Layer chamber ships with a sliding front door, a more stable top, and easier access to the temperature and humidity sensor. About one minute of assembly, then you are ready to grow.

  1. Unbox and place the base tray Set the base on a flat counter with room for the sliding door to open forward.
  2. Fit the top chamber onto the base The redesigned top locks into the base with a firm press. Align the four corner tabs first.
  3. Slide the front door into its track Guide the door into the top rail, then let it drop into the bottom groove. It should glide open with one finger.
  4. Attach the sensor cap on the ceiling Press the temperature and humidity sensor cap into the ceiling port until it clicks. Refill this cap with a fresh silica pad every two grows.
  5. Connect USB-C and drop in your block Plug the chamber into a 5V/2A USB-C source, drop in your colonized block, then open the Lykyn app to pick your species and press Start.
Double Layer, two shelves

Set Up Your Double Layer Chamber

Two shelves, up to a six pound block. About two minutes from unbox to first Start. Same steps for Obsidian Black and Bone White, so pick whichever matches your kitchen.

  1. Fill the tank with distilled water Twist off the humidifier tank at the base, fill to the marked line with distilled water, and re-seat it. Tap water leaves scale on the piezo.
  2. Plug in via USB-C Any 5V/2A USB-C source works. If you are using your own adapter, keep it 15W or higher.
  3. Connect to 2.4 GHz Wi-Fi in the app Open the Lykyn app, tap Add a Device, and pick your home network. The chamber only sees 2.4 GHz, so switch off 5 GHz on that band during pairing if your router combines them.
  4. Drop in your pre-colonized block Slide the front open, place the block on the lower shelf, and if you have a second block put it on the upper shelf. Keep at least 3 cm of headspace above each block.
  5. Pick your species and tap Start Choose the species in the app so the chamber loads the correct humidity, temperature, and light program. Auto Grow will handle the rest.

Your first grow starts today

Chamber assembled and Wi-Fi paired. Add a fruiting block and you will see pins in 5 to 10 days.

Shop fruiting blocks
Stuck somewhere

We answer every email personally

If a step in the video does not match what you see in the box, or if pairing fails, write to us. We reply personally, usually within a few hours.